Perfect Your Gun Mount at Home
You don't have to visit a clay-target range to improve your shooting form
You don't have to visit a clay-target range to improve your shooting form
By Chris Jennings (Images from OSP Shooting School)
Practice makes perfect when it comes to improving your shotgunning skills. But simply repeating bad habits at a clay target range during the off-season doesn't help. The key to becoming a better wingshot is to work on proper shooting form.
"Hunters don't practice enough, and the main reason is that they don't know what to practice," says Gil Ash, owner of the Optimum Shotgun Performance Shooting School. He and his wife, Vicki, have devised a shooting method based on learning why you hit or miss a target. The process begins with focusing on the target as you mount the gun.
"The thing I want shooters to understand right away is the sight picture," Ash says. "The first step is to see the target and keep your eyes on the bird. I spend the majority of my time teaching hunters to stop looking at the gun barrel."
In many cases, proper shooting form goes out the window as soon as a waterfowler hears the words "take 'em" and begins to rush his gun mount. "The duck hunter finds the end of the barrel, adds a two-foot lead, and pulls the trigger," Ash explains. "That's a bad way to start, and things go from bad to worse as soon as your eyes leave the target to look at the gun barrel."
Ash recommends working on your shooting form by practicing crossing shots. The best way to do this, of course, is at your local trap or skeet range. However, since most hunters can't get out as often as they would like, Ash has devised a way to practice your gun mount and swing in the friendly confines of your own living room. All you need is a shotgun and a mini flashlight. Here's how it works.
Begin by inserting a small adjustable flashlight into the muzzle of an unloaded shotgun.
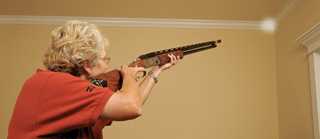
Photo OSP Shooting School
Turn on the flashlight and secure it with electrical tape. Standing with the gun in a low ready position, aim the light at the upper corner of a darkened room.Keep your eyes focused on that corner, and try to hold the light there as you mount the gun. Repeat this exercise a dozen or more times, maintaining a slow, steady, and controlled mount by keeping the light pointed at the same spot.
The next step is to work on keeping your barrel steady while swinging it toward a "moving" target. You can simulate the process of tracking a flying bird by following the line where the wall meets the ceiling. Start your gun mount in the middle of the room.
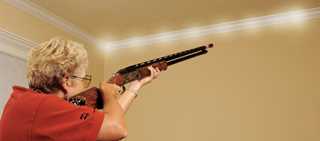
Photo OSP Shooting School
As you swing the gun from left to right, try to keep the light moving in a straight line along the seam of the ceiling. Finish the shooting sequence in the corner of the room. Repeat the process until you are comfortable with mounting and swinging the gun in one fluid motion.
Next practice swinging the gun from right to left along the ceiling line. Such shots can be more difficult for right-handed shooters because you have to train yourself to look across the barrel of the gun at the left edge of the light. If you're left-handed, you may have more trouble with left-to-right crossers for the same reason.
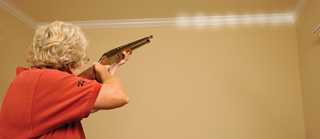
Photo OSP Shooting School
"This lesson provides a sight picture, but what it also does is teach the body and eyes to react without thinking," Ash says. "When you insert the barrel in front of the target, which is exactly where it should be as you mount the gun, you have to look across the barrel at the target. As you finish your gun mount, the gun should match the exact speed of the target. This is extremely important to maintain proper lead."
Share this photo
Ducks Unlimited uses cookies to enhance your browsing experience, optimize site functionality, analyze traffic, and deliver personalized advertising through third parties. By continuing to use this site, you agree to our use of cookies. View Privacy Policy