Attract wood ducks and cavity nesting birds with a nesting box. Learn how to build, install, and maintain your own box. Ensure a safe and inviting environment for these ducks and increase your chances of repeated nesting in the future. Get started now!
Updated on January 23, 2025 •
6 min read
Kirk Sorensen
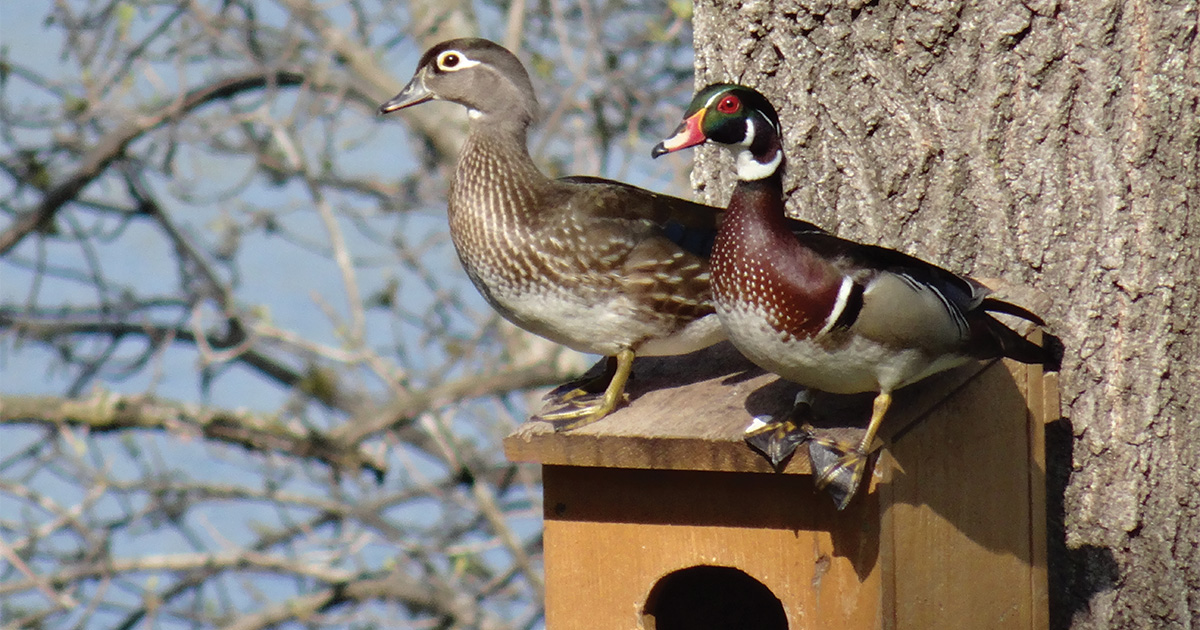
A Home for Wood Ducks and Others
Wood ducks, buffleheads, barrow's goldeneyes, common goldeneyes, hooded mergansers and common mergansers are all cavity nesting ducks. These ducks build nests in abandoned woodpecker holes or natural tree cavities caused by disease, fire or lightning. They will also use a constructed nesting box. Nest boxes can play an important role in conserving local populations of cavity-nesting ducks and other birds, in environments where natural cavities are scarce.
Don't have wood ducks in your area?A duck box may even attract other cavity nesting birds such as kestrels, tree swallows, great crested flycatchers, or screech owls.
(1) 1 X 10 X 12' cedar board (.75" x 9.25" x 12' actual)
Safety glasses
Measuring tape
Handsaw or table saw
Jigsaw
Drill and 1/2" bit
Screwdriver or driving bit for screws
Sandpaper
Wood screws
Cedar shavings
What is the Best Board to Use for Building a Nesting Box?
Cedar lumber is recommended because it is naturally resistant to weather and insects. You can also use other lumber such as pine or plywood. Boxes made of plastic or metal are not preferred. Do not use treated lumber.
We recommend one 1 X 10 X 12' cedar board (3/4" thick by 9 1/4" wide) lumber that is rough on one side (for the inside of the box).
Step-by-Step Guide to Building Your Duck Box
Step 1: Prepare your Materials
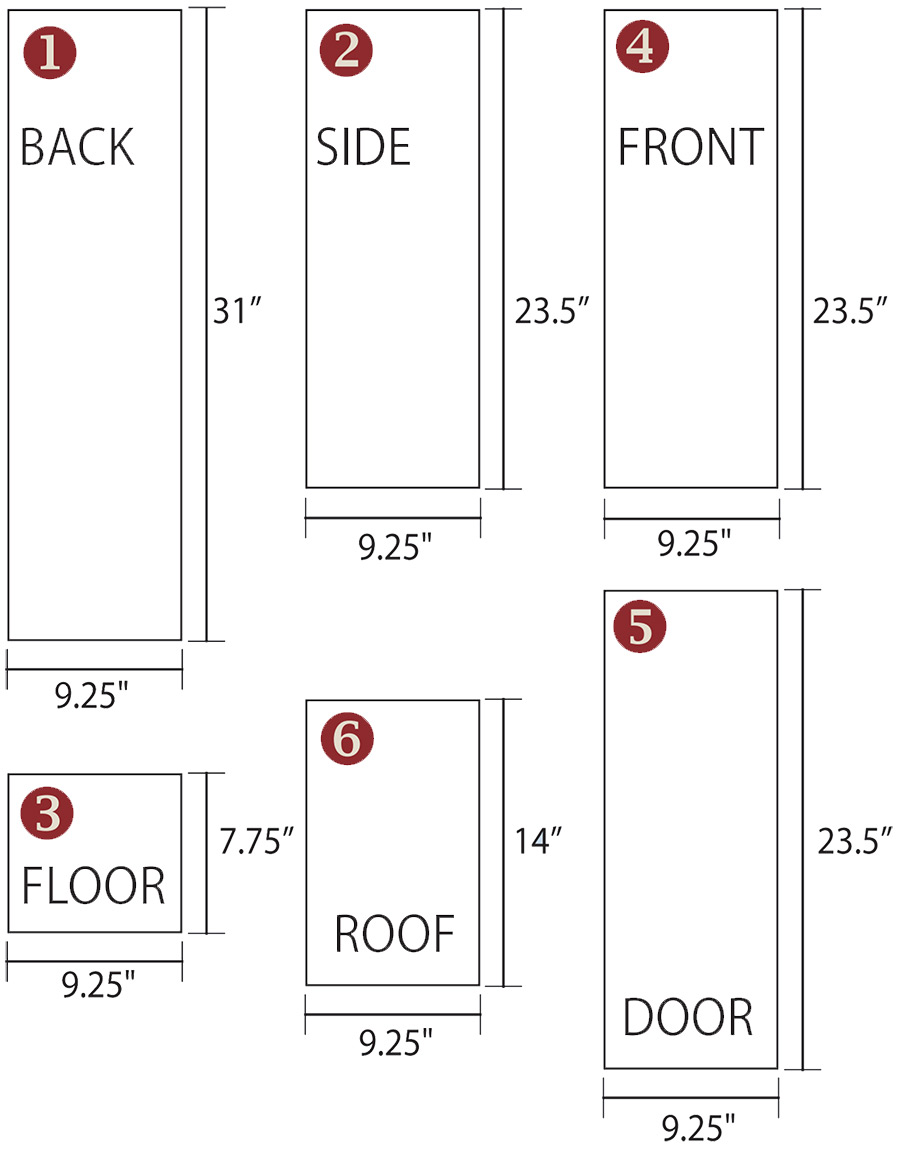
Measure and cut your board to produce the six pieces as shown below. If you are cutting your board with a handsaw or jigsaw, use anything with a straight edge (square, ruler, or spare board) to mark a line with a pencil as a guide.
Double check your measurements for accuracy before cutting. As you make your cuts, label your pieces for reference during assembly.
Protect your eyes: Wear your safety glasses.
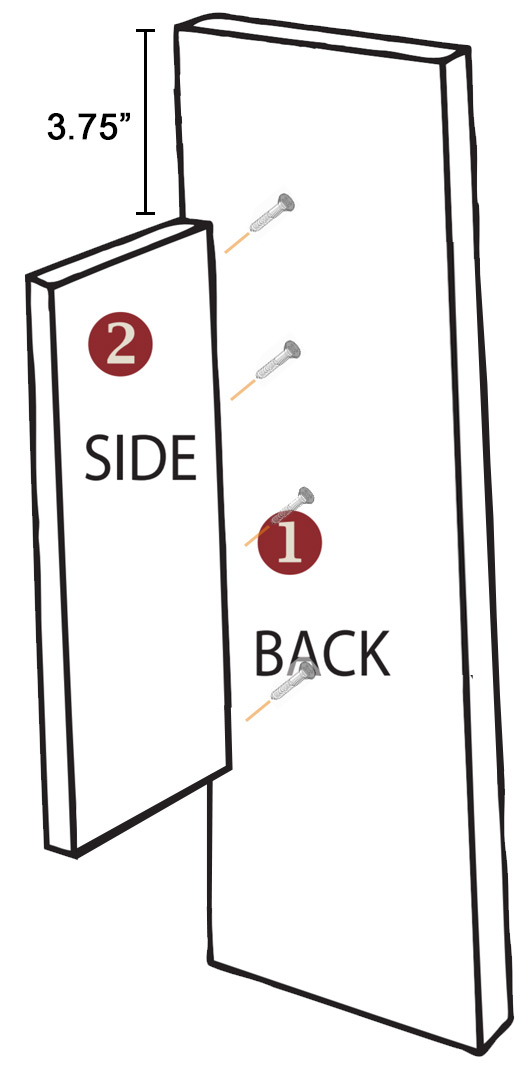
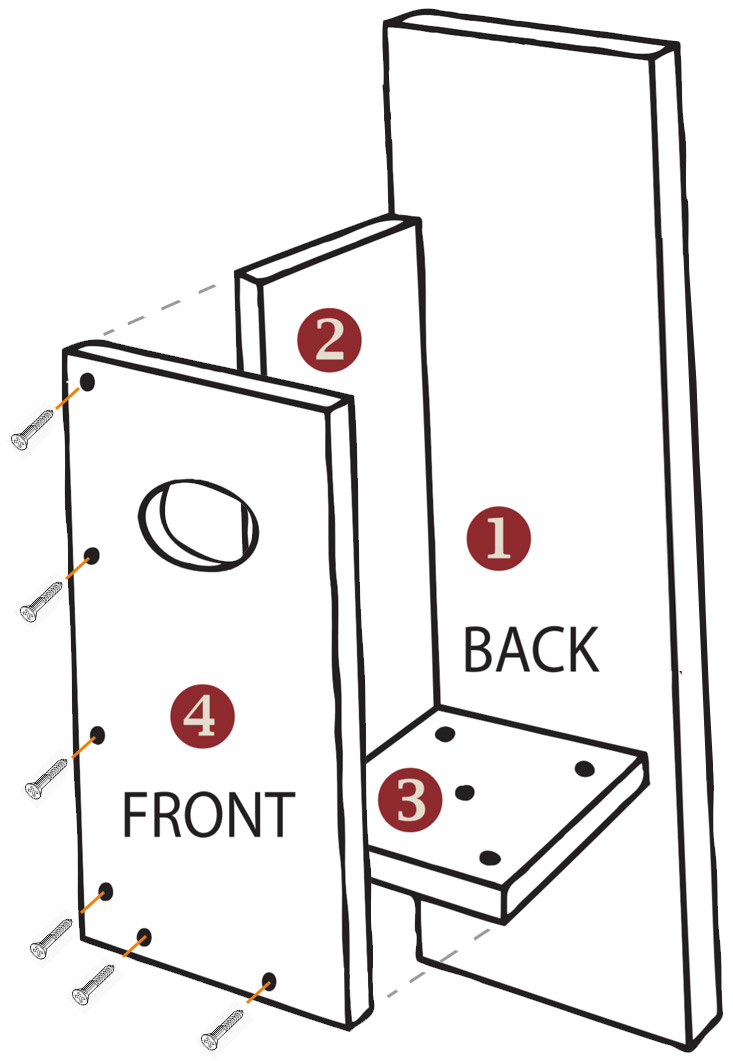
Step 2: Assemble the Outside of the Box
Attach the back (1) to the side (2) using four screws fastened from the back of the wood duck box as shown below.
Tip: For best results during the entire construction of your wood duck box, drill pilot holes as needed using an appropriate size drill bit (slightly smaller than the diameter of your wood screws) to avoid splitting your boards.
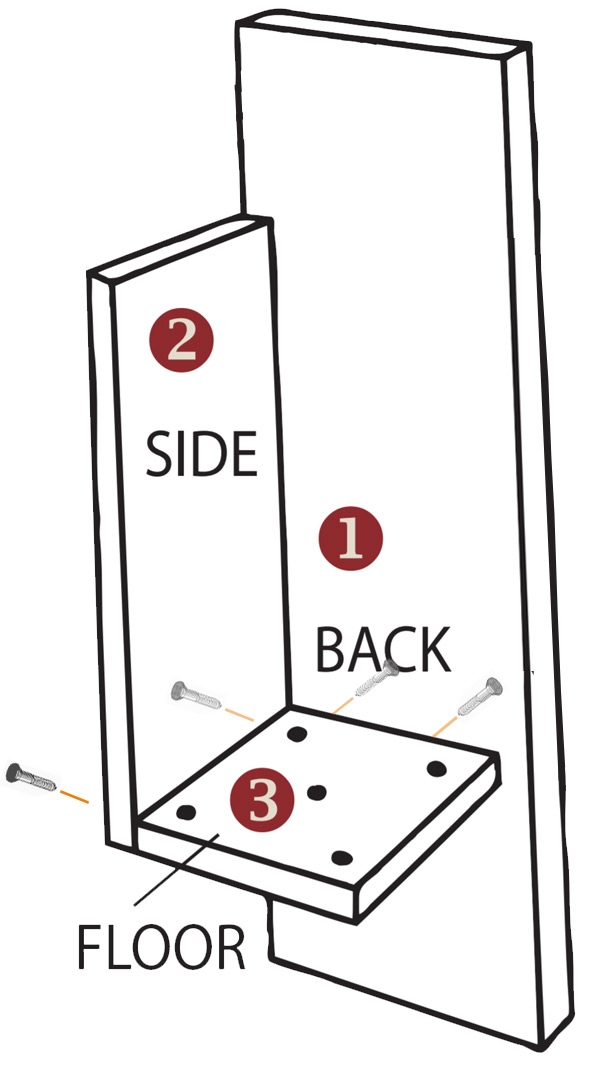
Step 3: Install the Floor
Drill five 1/2" drainage holes into the floor (3) as shown. Attach the floor by fastening two screws through the back (1) and two through the side (2).
Note: the shorter side (7.75") faces front.
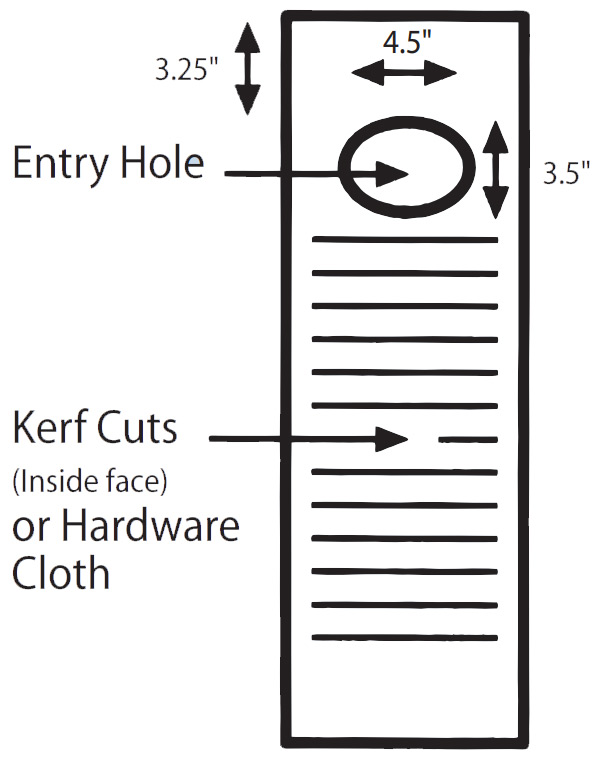
Step 4: Create the Entry Hole
Draw the entry hole on the front (4) using a pencil (4 1/2" x 3 1/2" oval). Drill a pilot hole and cut out the entry hole using a jigsaw. See detailed view below. Proper entry hole dimensions are critical.
Score the inside face of the front (4) with a saw. The horizontal slots will provide toe holds when the ducklings climb out. Note: You can also use steel hardware cloth fencing attached with a staple gun for toe holds.
Step 5: Attach the Front
Attach the front (4) using six screws.
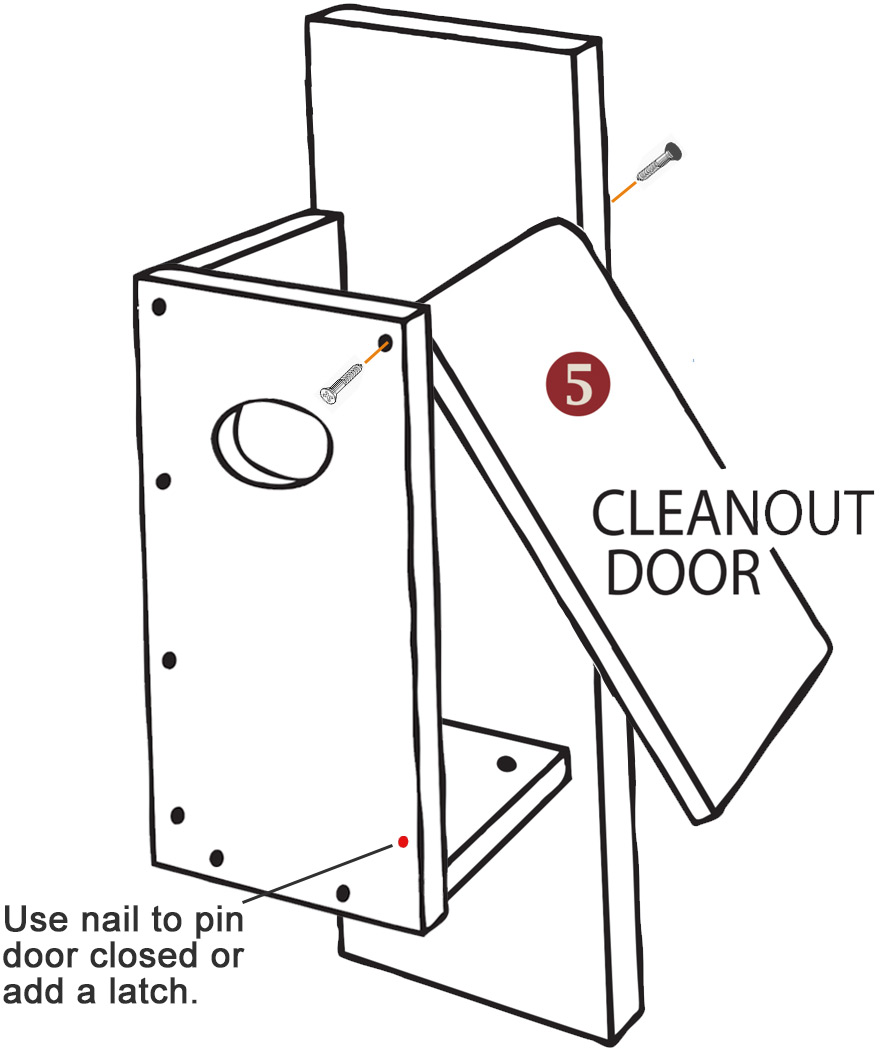
Step 6: Attach the Cleanout Door
Round the top outside edge of the door (5) with sandpaper.
Fasten the door at the top with one screw from the front and one from the back. The two screws form the hinge and allow the door to open.
Pin the door shut with a nail from the front or add a latch. If using a nail, do not hammer all the way in. You will remove this nail to gain access to the inside of the box for future maintenance (e.g., cleaning out the box each winter).
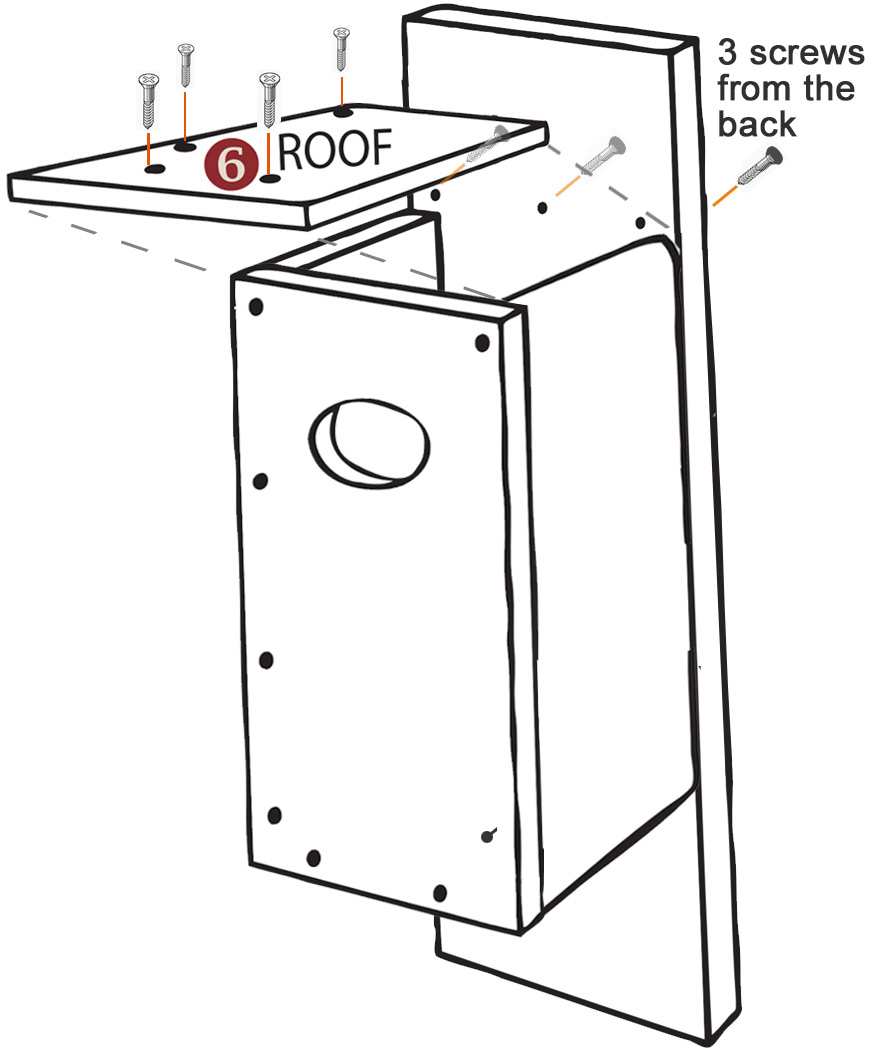
Step 7: Attach the Roof
Attach the roof (6) using four screws from the top and three screws from the back (be careful not to screw into the door).
Finishing Touches
Ducks Unlimited does not recommend applying a finish to cedar boxes. A finish might help to extend the life of a plywood box.
If you decide to apply a finish to your nest box, use a nontoxic wood preserver or a light shade of an earth-tone paint.
The ducks will find your box by seeing the contrast in color caused by the entry hole. Do not apply finish inside the box.
Cavity nesting ducks do not carry nesting materials. It's important to help them out by placing four to six inches of wood shavings in the bottom of the box. You can find wood shavings at your local pet or farm supply store. Do not use sawdust. It can suffocate ducklings and holds moisture.
Be sure and construct a predator guard for your wood duck box before installing.
Maintenance
Every year in the fall, after the nesting season has completed, or in the winter, clean out old nesting material from the box and replace it with a fresh layer of wood shavings. This annual cleaning needs to be part of your long-term maintenance commitment once you place your nest box.
Avoid the urge to look into the box during spring and summer.
Once a cavity nesting bird starts using your box, you'll likely see many broods raised over the years. Nesting sites for these birds are limited in number. When they find a good nesting site, there is a very good chance they'll return in following years.
If you don't have any ducks using your box over the summer, don't worry. Waterfowl biologists have seen waterfowl migrating in the fall scope out potential nesting sites for next spring. This too is a good reason to keep your boxes in top condition. You never know when a duck might hop into the box.
This information has been compiled from the nest box guide for waterfowl by Ducks Unlimited and the Canadian Wildlife Service, Environment Canada; and a conservator article by Mearl Ronney (Vol. 19, No. 3).
A: Ducks Unlimited advises against applying any finish to cedar boxes, as cedar naturally resists weather and insects. However, a nontoxic wood preserver or a light shade of earth-tone paint may be used on plywood boxes to extend their life. Remember not to apply any finish inside the box.
Q: How can I help cavity nesting ducks with their nesting materials?
A: Since cavity nesting ducks do not bring their own nesting materials, it's crucial to add four to six inches of wood shavings to the bottom of your nest box. Avoid using sawdust as it can suffocate ducklings and retain moisture. Wood shavings are available at local pet or farm supply stores.
Q: Is a predator guard necessary for a nest box?
A: Yes, constructing a predator guard is essential to protect the nesting birds from potential threats. Install the predator guard before putting up your nest duck box to ensure the safety of its inhabitants.
Q: How often should I clean out the nest box, and why is it important?
A: Clean out the nest box annually, either in the fall after the nesting season has ended or in the winter. This process involves removing old nesting material and replacing it with fresh wood shavings. Regular maintenance prevents the accumulation of parasites and diseases, ensuring a safe and appealing environment for nesting birds.
Q: Can I check on the nesting progress during spring and summer?
A: Resist the urge to peek inside the box during the nesting season. Disturbing the nest can lead to abandonment or stress for the nesting birds. Observation from a distance is recommended to avoid any interference with the natural nesting process.
Q: What if no ducks use my nest box over the summer?
A: If your nest box remains unoccupied during the summer, do not be discouraged. Waterfowl biologists note that ducks often scout for potential nesting sites in the fall for the following spring. Keeping your nest box in good condition ensures it's ready for occupants whenever they may arrive, promoting continued use and the possibility of attracting nesting birds in future seasons.
Select Location
State Abbreviation or Zip
Share this photo
We Use Cookies
Ducks Unlimited uses cookies to enhance your browsing experience,
optimize site functionality, analyze traffic, and deliver personalized
advertising through third parties.
By continuing to use this site, you agree to our use of cookies.
View Privacy Policy